|
Research Ideas and Outcomes : Methods
|
|
Corresponding author: Christopher R Madan (madanc@bc.edu)
Received: 04 Sep 2016 | Published: 08 Sep 2016
© 2016 Christopher R Madan.
This is an open access article distributed under the terms of the Creative Commons Attribution License (CC BY 4.0), which permits unrestricted use, distribution, and reproduction in any medium, provided the original author and source are credited.
Citation: Madan C (2016) Improved understanding of brain morphology through 3D printing: A brief guide. Research Ideas and Outcomes 2: e10398. doi: 10.3897/rio.2.e10398
|

|
Abstract
Background
Brain morphology can provide insights into inter-individual differences. In the present guide, we outline the steps for generating a print-ready 3D model of brain structures from a standard T1-weighted structural MRI volume. By improving our understanding of brain morphology, we hope to enhance teaching and scientific communication, as well as aid in the development of novel measures of brain morphology.
New information
The present guide details the steps for generating a print-ready 3D model of brain structures from a standard T1-weighted structural MRI volume.
Keywords
brain morphology; 3d printing; structural MRI
Introduction
Recent research has demonstrated that shape-related properties (i.e., morphology) of the brain can be useful in characterizing inter-individual differences (e.g.,
Implementation
Methodology
1. Surface reconstruction
FreeSurfer (http://freesurfer.net/fswiki) (
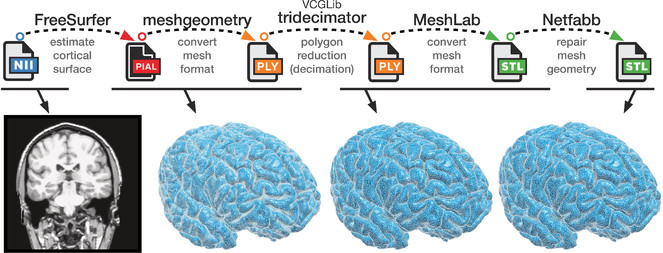
2. Converting mesh and decimation
After the FreeSurfer pipeline has been run, the remaining steps can be executed within a few minutes, provided the necessary programs are already installed. Nearly all of these remaining steps can be executed via a command-line interface, with the commands listed in
Code
|
1 2 3 4 5 6 7 8 9 10 11 12 13 |
mg=/Applications/Research/imaging/meshgeometry/meshgeometry_mac ml=/Applications/meshlab.app/Contents/MacOS/meshlabserver td=/Applications/Research/imaging/vcglib/apps/tridecimator/tridecimator
f=rh.pial $mg -i $f -centre -o $f.ply $td $f.ply $f.dec.ply 100000 $ml -i $f.dec.ply -o $f.dec.stl
f=lh.pial $mg -i $f -centre -o $f.ply $td $f.ply $f.dec.ply 100000 $ml -i $f.dec.ply -o $f.dec.stl |
First, the cortical surface files (lh.pial and rh.pial) are converted to a generic mesh format (.ply) using meshgeometry (https://github.com/r03ert0/meshgeometry). As an example, resulting ply files are provided as supplemental here (
3. Repairing the mesh
For 3D printing, meshes usually need to be 'repaired' to ensure that there are no holes or other issues with the mesh structure (cf. https://library.ualberta.ca/services/3dprinting/preparing-3d-model). This repair process can be readily accomplished using the online version of Netfabb (https://netfabb.azurewebsites.net), though a local version can instead be installed (https://www.netfabb.com/products/netfabb-basic).
(Also see http://www.shapeways.com/tutorials/how_to_use_meshlab_and_netfabb.)
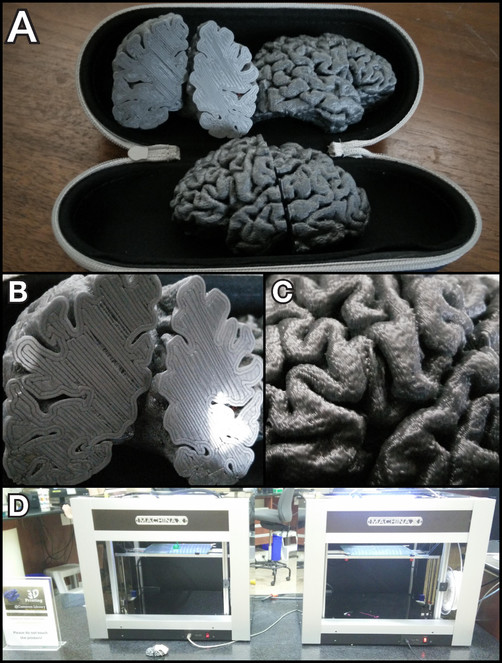
4. 3D printing
The resulting files (.stl) are now print-ready.
Acknowledgements
The code for converting and decimating the meshes was modified from Roberto Toro's qcsurf project (https://github.com/r03ert0/qcsurf; also see https://github.com/cMadan/brain3d). Information for repairing meshes to make them print-ready was inspired by a tutorial from the University of Alberta Library website (https://library.ualberta.ca/services/3dprinting/preparing-3d-model). The 3D models were printed by the University of Alberta Libraries.
Funding program
CRM is supported by a fellowship from the Canadian Institutes of Health Research (FRN-146793).
References
-
Cortical surface-based analysis. I. Segmentation and surface reconstruction.NeuroImage9:179‑194. DOI: 10.1006/nimg.1998.0395
-
FreeSurfer.NeuroImage62:774‑781. DOI: 10.1016/j.neuroimage.2012.01.021
-
Whole brain segmentation: Automated labeling of neuroanatomical structures in the human brain.Neuron33:341‑355. DOI: 10.1016/S0896-6273(02)00569-X
-
The structure of the cerebral cortex across adult life: age-related patterns of surface area, thickness, and gyrification.Cerebral Cortex23:2521‑2530. DOI: 10.1093/cercor/bhs231
-
Creating 3D visualizations of MRI data: A brief guide.F1000Research4:466. DOI: 10.12688/f1000research.6838.1
-
Cortical complexity as a measure of age-related brain atrophy.NeuroImage134:617‑629. DOI: 10.1016/j.neuroimage.2016.04.029
-
Navigation-related structural change in the hippocampi of taxi drivers.Proceedings of the National Academy of Sciences of the United States of America97:4398‑4403. DOI: 10.1073/pnas.070039597
-
Influence of age, sex and genetic factors on the human brain.Brain Imaging and Behavior8:143‑152. DOI: 10.1007/s11682-013-9277-5
-
Genetics and brain morphology.Neuropsychology Review25:63‑96. DOI: 10.1007/s11065-015-9281-1
-
Brain structural maturation and the foundations of cognitive behavioral development.Current Opinion in Neurology27:176‑184. DOI: 10.1097/WCO.0000000000000074
Supplementary material
Compiling tridecimator
To compile tridecimator, you need to run two commands (from inside the vcglib/apps/tridecimator directory):
[1] qmake tridecimator.pro
This should generate a few files, including 'Makefile'.
[2] make
You should now have 'tridecimator' (no file extension) – this is the actual executable program. (I get 1 warning when I compile, but this is fine.)
If you don't have qmake installed, see https://github.com/thoughtbot/capybara-webkit/wiki/Installing-Qt-and-compiling-capybara-webkit.